Vue分页查询如何实现 |
您所在的位置:网站首页 › vue elementui优点 › Vue分页查询如何实现 |
Vue分页查询如何实现
|
Vue分页查询如何实现
发布时间:2023-04-11 17:10:46
来源:亿速云
阅读:52
作者:iii
栏目:开发技术
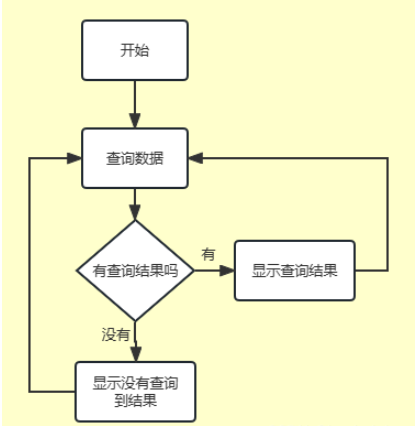
这篇文章主要介绍“Vue分页查询如何实现”,在日常操作中,相信很多人在Vue分页查询如何实现问题上存在疑惑,小编查阅了各式资料,整理出简单好用的操作方法,希望对大家解答”Vue分页查询如何实现”的疑惑有所帮助!接下来,请跟着小编一起来学习吧! 我编写了一个简单的前端页面用来查询数据,页面一共有几个逻辑
具体的效果可以看下面的演示
下面就来看一下具体的实现步骤。 首先看一下vue的代码 Vue.createApp({ data() { return { items : [], // 关键词 keyword : "", // 是否没有数据 isnull : false, // 一开始不显示上一页和下一页 isshow : false, // 一共有多少条数据 countInfo : 0, // 每一页显示几条数据 pageSize : 10, // 当前是第几页 currentPage : 1, // 一共有几页 countAll : 1, code : 200 } }, methods: { search() { // 拿到待搜索的关键词 var keyword = document.getElementById("keyword").value; console.log(keyword); this.keyword = keyword; this.currentPage = 1; var url = "http://localhost:8080/csdn/search/" + keyword + "/" + this.currentPage; console.log(url); axios.get(url).then((response) => { if(response.data.msg.count==0) { this.isnull = true; // 将原始数据置空 this.items = []; // 不显示上一页下一页按钮 this.isshow = false; } else { this.isnull = false; console.log(response) this.items = response.data.msg.list; this.countInfo = response.data.msg.count; // 计算一共有几页 this.countAll = Math.ceil(response.data.msg.count / this.pageSize); this.isshow = true; } }) .catch(function (error) { console.log(error); }); }, getNextPage() { if(this.currentPage == this.countAll) { this.currentPage = this.currentPage; } else { this.currentPage = this.currentPage + 1; } var url = "http://localhost:8080/csdn/search/" + this.keyword + "/" + this.currentPage; axios.get(url).then((response) => { console.log(response) this.items = response.data.msg.list; // 计算一共有几页 this.countAll = Math.ceil(response.data.msg.count / this.pageSize); }) .catch(function (error) { console.log(error); }); }, getPrePage() { if(this.currentPage == 1) { this.currentPage = 1; } else { this.currentPage = this.currentPage - 1; } var url = "http://localhost:8080/csdn/search/" + this.keyword + "/" + this.currentPage; axios.get(url).then((response) => { console.log(response) this.items = response.data.msg.list; // 计算一共有几页 this.countAll = Math.ceil(response.data.msg.count / this.pageSize); }) .catch(function (error) { console.log(error); }); } }, }).mount("#app");data()中返回了几个变量, items:用来存放待展示的数据项 keyword:记录本次查询使用的关键词 isnull:表示一次查询的结果数量是否为0,用来控制没有结果的显示逻辑 isshow:表示是否显示上一页下一页按钮,以及显示当前页数和数据总数 countInfo:记录一共有多少条结果 pageSize:记录每页显示的数据项,目前后端固定每页展示10条数据 currentPage:记录当前是第几页 countAll:记录一共有多少页数据 code:后端返回的一个状态码,没什么用 一共提供了三个方法进行查询 search():进行一个新的关键词的查询 getNextPage():查询下一页的数据,如果已经是最后一页了,则查询当前页的结果 getPrePage():查询上一页的数据,如果已经是第一页了,则查询当前页的结果 接着我们再来看一下后端返回的数据格式
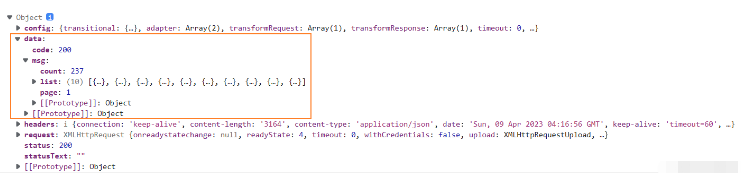
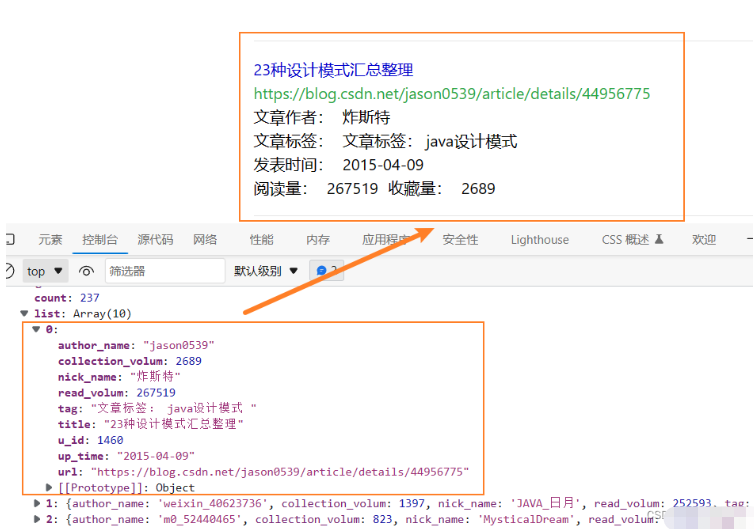
上图中方框内的数据就是后端返回的数据,msg中记录的就是我们需要用到的数据,里面有交给数据项 count:表示数据总数,只是查询数据总数,并不会将所有的数据都返回给前端 list:返回当前页的数据 page:表示当前是第几页 我们具体来看一下list中数据项的内容
可以发现list中的每一项就是构成我们前端页面中一行的数据,这在vue中体现为数据的绑定,下面就来看看详细的html代码 纳米搜索 纳米搜索 搜索 {{item.title}} {{item.url}} 文章作者:{{item.nick_name}} 文章标签:{{item.tag}} 发表时间:{{item.up_time}} 阅读量:{{item.read_volum}} 收藏量:{{item.collection_volum}} 非常抱歉,没有您想要的结果(。・_・。)ノI'm sorry~ 上一页 下一页 第{{currentPage}}/{{countAll}}页 共有{{countInfo}}条数据 Vue.createApp({ data() { return { items : [], // 关键词 keyword : "", // 是否没有数据 isnull : false, // 一开始不显示上一页和下一页 isshow : false, // 一共有多少条数据 countInfo : 0, // 每一页显示几条数据 pageSize : 10, // 当前是第几页 currentPage : 1, // 一共有几页 countAll : 1, code : 200 } }, methods: { search() { // 拿到待搜索的关键词 var keyword = document.getElementById("keyword").value; console.log(keyword); this.keyword = keyword; this.currentPage = 1; var url = "http://localhost:8080/csdn/search/" + keyword + "/" + this.currentPage; console.log(url); axios.get(url).then((response) => { if(response.data.msg.count==0) { this.isnull = true; // 将原始数据置空 this.items = []; // 不显示上一页下一页按钮 this.isshow = false; } else { this.isnull = false; console.log(response) this.items = response.data.msg.list; this.countInfo = response.data.msg.count; // 计算一共有几页 this.countAll = Math.ceil(response.data.msg.count / this.pageSize); this.isshow = true; } }) .catch(function (error) { console.log(error); }); }, getNextPage() { if(this.currentPage == this.countAll) { this.currentPage = this.currentPage; } else { this.currentPage = this.currentPage + 1; } var url = "http://localhost:8080/csdn/search/" + this.keyword + "/" + this.currentPage; axios.get(url).then((response) => { console.log(response) this.items = response.data.msg.list; // 计算一共有几页 this.countAll = Math.ceil(response.data.msg.count / this.pageSize); }) .catch(function (error) { console.log(error); }); }, getPrePage() { if(this.currentPage == 1) { this.currentPage = 1; } else { this.currentPage = this.currentPage - 1; } var url = "http://localhost:8080/csdn/search/" + this.keyword + "/" + this.currentPage; axios.get(url).then((response) => { console.log(response) this.items = response.data.msg.list; // 计算一共有几页 this.countAll = Math.ceil(response.data.msg.count / this.pageSize); }) .catch(function (error) { console.log(error); }); } }, }).mount("#app");使用vue编写前端动态页面真的比原生js或者jquery要方便很多,对比theamleaf也有很多好处。 我们在使用theamleaf的时候,每次提交表单都需要刷新页面,使用vue+axios进行ajax请求则不需要刷新页面,这不仅会减轻服务端的压力,而且可以带来更好的用户体验。 到此,关于“Vue分页查询如何实现”的学习就结束了,希望能够解决大家的疑惑。理论与实践的搭配能更好的帮助大家学习,快去试试吧!若想继续学习更多相关知识,请继续关注亿速云网站,小编会继续努力为大家带来更多实用的文章! 推荐阅读: Vue中Computed和Watch的区别及其用法 Vue中使用可视化图表echarts的方法免责声明:本站发布的内容(图片、视频和文字)以原创、转载和分享为主,文章观点不代表本网站立场,如果涉及侵权请联系站长邮箱:[email protected]进行举报,并提供相关证据,一经查实,将立刻删除涉嫌侵权内容。 vue 上一篇新闻:Python怎么实现实时跟随微信窗口移动的GUI界面 下一篇新闻:spring-boot-maven-plugin打包时排除provided依赖问题怎么解决 猜你喜欢 rest api开发的工作原理是什么 RabbitMQ集群如何搭建 maven-jar-plugin插件怎么使用 properties-maven-plugin插件怎么使用 maven-shade-plugin插件怎么使用 怎么下载Maven并安装配置 Maven仓库的知识点有哪些 如何创建Maven的项目 Maven如何使用 JavaWeb的同源策略是什么 |

【本文地址】
今日新闻 |
推荐新闻 |